
First steps with Python and pyVmomi (vSphere SDK for Python)
In December 2013, VMware made an christmas gift to the community by releasing pyVmomi. pyVmomi is a SDK that allows you to manage VMware ESXi and vCenter using Python and the VMware vSphere API. Nearly 18 months are past since then and pyVmomi has developed over time.
I’ve started to play around with Python, and I’ve written about the reasons in one of my last blog posts (Hey infrastructure guy, you should learn Python!).
How to get pyVmomi?
You can install the official release of pyVmomi using pip (pip installs packages, a recursive acronym).
pip3 install --upgrade pyvmomi
The latest version is available on GitHub. To get the latest version, use
python setup.py develop

or

python setup.py install
That you can fetch the latest version from GitHub is pretty cool and shows a big benefit: The community can contribute to pyVmomi and it’s more frequently updated. A huge benefit in regard of code quality and features.
What Python releases are support?
The latest information about supported Python releases can be found on the GitHub page of the project.
- pyVmomi 6.0.0.2016.4 and later support 2.7, 3.3 and 3.4
- pyVmomi 6.0.0 and later support 2.7, 3.3 and 3.4
- pyVmomi 5.5.0-2014.1 and 5.5.0-2014.1.1 support Python 2.6, 2.7, 3.3 and 3.4
- pyVmomi 5.5.0 and below support Python 2.6 and 2.7
Interesting fact: pyVmomi version numbers correlate with vSphere releases. pyVmomi 6.0.0 was released with the GA of VMware vSphere 6. pyVmomi supports the corresponding vSphere release and the previous four vSphere releases.
I’m using Python 3 for my examples. I wouldn’t recommend to start with Python 2 these days.
First steps
pyVmomi allows you to manage VMware ESXi and vCenter using Python and the VMware vSphere API. Because of this, the VMware vSphere API Reference Documentation will be your best friend.
First of all, you need a connection to the API. To connect to the vSphere API, we have to import and use the module pyVim, more precise, the pyVim.connect module and the SmartConnect function. pyVim.connect is used for the connection handling (creation, deletion…) to the Virtualization Management Object Management Infrastructure (VMOMI). pyVim is part of pyVmomi and it’s installed automatically.
from pyVim.connect import SmartConnect

c = SmartConnect(host="192.168.20.1", user="root", pwd='Passw0rd')
SmartConnect accepts various parameters, but for the beginning it’s sufficient to use three of them: host, user and pwd. You can use “help(SmartConnect)” to get information about the SmartConnect function. “c” is the object (pyVmomi.VmomiSupport.vim.ServiceInstance) which we will use later.
A connection itself is useless. But how can we explore the API? Python doesn’t support typing, so it can be difficult to “explore” an API. That’s why the VMware vSphere API Reference Documentation and the Managed Object Browser (MOB) will be your best friends. The MOB is a web-based interface and represents the vSphere API. It allows you to navigate through the API. Any changes you make through the MOB, by invoking methods, take effect and change the config or will give you an output.
Important: If you are using VMware vSphere 6 (ESXi 6.0 and vCenter 6.0), you have to enable the MOB. The MOB is disabled by default. Check VMware KB2108405 (The Managed Object Browser is disabled by default in vSphere 6.0) for more details.
Open a browser and open https://ip-or-fqdn/mob. You can use the IP address or the FQDN of an ESXi host or a vCenter Server (Appliance). I use a standalone ESXi 5.5 host in this example.

Patrick Terlisten/ vcloudnine.de/ Creative Commons CC0
Our first code
Let’s try something easy. I’ve framed a method in the screenshot above. We will use this method now.
from pyVim.connect import SmartConnect

c = SmartConnect(host="192.168.20.1", user="root", pwd='Passw0rd')

print(c.CurrentTime())
This code will connect to the vSphere API, invoke the method “CurrentTime()” and prints the result. What happens if we execute our first lines of Python code? We will get an error…
self.\_sslobj.do\_handshake()
ssl.SSLError: \[SSL: CERTIFICATE\_VERIFY\_FAILED\] certificate verify failed (\_ssl.c:645)
Python checks SSL certificates in strict mode. Because of this, untrusted certificates will cause trouble. This applies to Python 3, as well as to Python >= 2.7.9 (PEP 0466). Most people use untrusted certificates. To deal with this, we have to create a context for our HTTP connection. This context can be used by the SmartConnect function. To create a context, we have to import the ssl module of Python.
from pyVim.connect import SmartConnect
import ssl

s = ssl.SSLContext(ssl.PROTOCOL\_TLSv1)
s.verify\_mode = ssl.CERT\_NONE

c = SmartConnect(host="192.168.20.1", user="root", pwd='Passw0rd', sslContext=s)

print(c.CurrentTime())
“s” is the new object (ssl.SSLContext) we will use and the parameter “sslContext=s” will told SmartConnect to use this object.
Save this code into a file (I called it pyvmomitest.py in my example). Navigate to the folder, open a Python REPL and import the file you’ve saved (module) a moment ago.
C:\Users\p.terlisten\Documents\Development\Python\Playground>python
Python 3.5.1 (v3.5.1:37a07cee5969, Dec  6 2015, 01:38:48) \[MSC v.1900 32 bit (Intel)\] on win32
Type "help", "copyright", "credits" or "license" for more information.
>>> import pyvmomitest
2016-05-20 12:29:23.837049+00:00
>>>
Hurray! We used the vSphere API to get the current date and time (CET).
But what if we have deployed valid certificates? And what about housekeeping? We have connected, but we haven’t disconnected from the API? We can use a try-except block to handle this. And because we are nice, we import also the function “Disconnect” from pyVim.connect to disconnect from the vSphere API at the end.
from pyVim.connect import SmartConnect, Disconnect
import ssl

s = ssl.SSLContext(ssl.PROTOCOL\_TLSv1)
s.verify\_mode = ssl.CERT\_NONE

try:
    c = SmartConnect(host="192.168.20.1", user="root", pwd='Passw0rd')
    print('Valid certificate')
except:
    c = SmartConnect(host="192.168.20.1", user="root", pwd='Passw0rd', sslContext=s)
    print('Invalid or untrusted certificate')

print(c.CurrentTime())

Disconnect(c)
With this code, we should get the following output.
C:\Users\p.terlisten\Documents\Development\Python\Playground>python
Python 3.5.1 (v3.5.1:37a07cee5969, Dec  6 2015, 01:38:48) \[MSC v.1900 32 bit (Intel)\] on win32
Type "help", "copyright", "credits" or "license" for more information.
>>> import pyvmomitest
Invalid or untrusted certificate
2016-05-20 12:36:28.707876+00:00
>>>
Okay, the vSphere API wasn’t designed to retrieve the current date and time. Let’s look at something more useful. This script will give us the names of all VMs in the datacenter.
from pyVim.connect import SmartConnect, Disconnect
import ssl

s = ssl.SSLContext(ssl.PROTOCOL\_TLSv1)
s.verify\_mode = ssl.CERT\_NONE

try:
    c = SmartConnect(host="192.168.20.1", user="root", pwd='Passw0rd')
    print('Valid certificate')
except:
    c = SmartConnect(host="192.168.20.1", user="root", pwd='Passw0rd', sslContext=s)
    print('Invalid or untrusted certificate')

datacenter = c.content.rootFolder.childEntity\[0\]
vms = datacenter.vmFolder.childEntity

for i in vms:
    print(i.name)

Disconnect(c)
Let’s take this statement and look at everything after the “c”. We will use the MOB to navigate through the API. This will help you to understand, how the Python code and the structure of the vSphere API correlate.
datacenter = c.content.rootFolder.childEntity[0]
Open the MOB. You will easily find the property “content”.
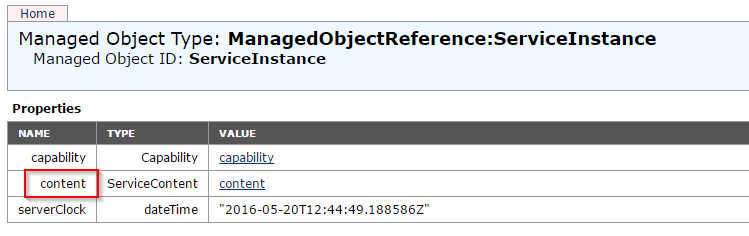
Patrick Terlisten/ vcloudnine.de/ Creative Commons CC0
Click on “content” and search for the property “rootFolder”.
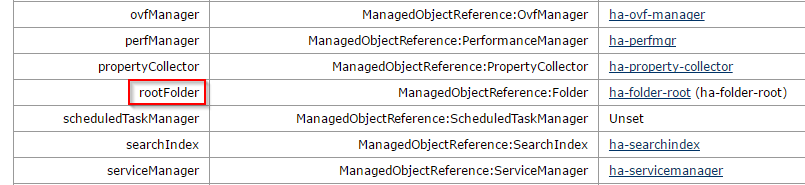
Patrick Terlisten/ vcloudnine.de/ Creative Commons CC0
Click on the value “ha-folder-root.” The property “childEntity” is an ManagedObjectReference (MOR) and references to all datacenters (the counting starts at 0) known to the ESXi or vCenter. The value “childEntity[0]” will give us the first datacenter.
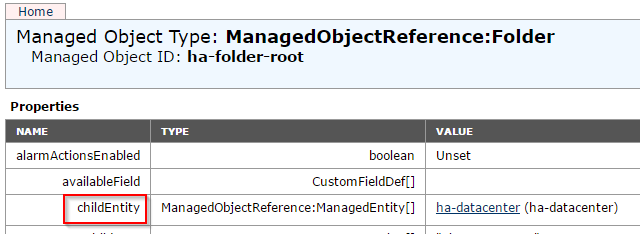
Patrick Terlisten/ vcloudnine.de/ Creative Commons CC0
If we have the datacenter, the way to get the names of the VMs is the same. You can use the MOB, to verify this.
vms = datacenter.vmFolder.childEntity
Click on the value “ha-datacenter”. At the bottom of the list, you will find the property “vmFolder”.

Patrick Terlisten/ vcloudnine.de/ Creative Commons CC0
Click on the value “ha-folder-vm”.
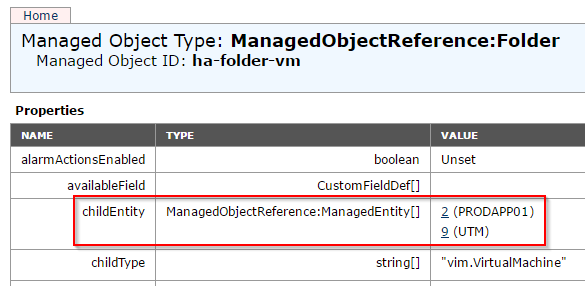
Patrick Terlisten/ vcloudnine.de/ Creative Commons CC0
The MOR “childEntity” references to two VMs. Click on one of the IDs.

Patrick Terlisten/ vcloudnine.de/ Creative Commons CC0
The property “name” includes the name of the VM. Because of this, we can use a simple
for i in vms:
    print(i.name)
to get the name for each VM.
Summary
This was only a short introduction into pyVmomi. You should be now able to install pyVmomi, make a connection to the vSphere API and retrieve some basic stuff.
Every day I discover something new. It’s important to understand how the vSphere API works. Play with pyVmomi and with the vSphere API. It looks harder as it is.
btw: There is a Hands-on-Lab available “HOL-SDC-1622 VMware Development Tools and SDKs”. Check it out!