
Load Balancing Microsoft Exchange 2013 with HAProxy
Since Exchange 2007 client connections are handled by the Client Access Server role. With Exchange 2010, Microsoft has introduced the concept of the Client Access Server Array (CAS Array). A CAS Array is required, when internal and external client connections should be load balanced over multiple client access servers. Many client access protocols in Exchange 2010 require session affinity. This means, that the connection between the client and a particular client access server must persist. This requires application-level load balancing for Exchange 2010 and Microsoft recommends this explicitly. Microsoft dropped the concept of the CAS Array in Exchange 2013 and implemented much more logic into the Exchange 2013 Client Access Server role. There is no more need for session affinity in any client access protocol used in Microsoft Exchange 2013. Connections to a Exchange 2013 client access servers can be directed to an available server. A simple DNS round-robin works, but if a server fails, DNS would not handle this.You can use Windows Network Load Balancing (WNLB), but it has several limitations and downsides. I blogged about one of them in my blog post Flooded network due HP Networking Switches & Windows NLB. The other point is, that you can’t use it when you build a two server CAS/ DAG Exchange 2013 environment: You can’t use WNLB on servers that have the Microsoft Failover Cluster role installed. At this point HAProxy comes into play.
HAProxy is a small and reliable TCP/ HTTP Load Balancer. HAproxy is Open Source and supports in its current release everything you need, e.g. support for SSL, IPv6, keep-alive etc. Sometimes there is no need for cost intensive or complex Load Balancers, e.g. for lab setups. HAProxy is small and easy to set up. All you need is your favorite Linux distribution in its current release. I like CentOS and I decied to use CentOS 7 to setup a small HAProxy deployment in my lab.
Installation
I have installed a minimal installation of CentOS 7 in a VM (2 GB memory, 1x vCPU, 1x VMXNET3 adapter). You can easily install HAProxy using YUM.
[root@haproxy ~]# yum install haproxy
Loaded plugins: fastestmirror
Loading mirror speeds from cached hostfile
 * base: ftp.hosteurope.de
 * extras: centos.intergenia.de
 * updates: centos.intergenia.de
Resolving Dependencies
--> Running transaction check
---> Package haproxy.x86_64 0:1.5.2-3.el7_0 will be installed
--> Finished Dependency Resolution

Dependencies Resolved

==============================================================================
 Package          Arch          Version          Repository          Size
==============================================================================
Installing:
 haproxy          x86_64        1.5.2-3.el7_0    updates             812 k

Transaction Summary
==============================================================================
Install  1 Package

Total download size: 812 k
Installed size: 2.5 M
Is this ok [y/d/N]: y
Downloading packages:
haproxy-1.5.2-3.el7_0.x86_64.rpm                                                                                                                           | 812 kB  00:00:03
Running transaction check
Running transaction test
Transaction test succeeded
Running transaction
  Installing : haproxy-1.5.2-3.el7_0.x86_64                                                                                                                                   1/1
  Verifying  : haproxy-1.5.2-3.el7_0.x86_64                                                                                                                                   1/1

Installed:
  haproxy.x86_64 0:1.5.2-3.el7_0

Complete!
That’s it. There’s nothing more to do. Now let’s configure HAproxy.
Configuration
Before you edit the configuration file, take a backup of the /etc/haproxy/haproxy.conf. My haproxy.conf looks like this.
defaults
    log global
    option tcplog
    option dontlognull
    option redispatch
    retries 3
    timeout http-request 10s
    timeout http-keep-alive 10s
    timeout check 10s
    timeout server 10s
    timeout connect 10s
    timeout client 10s

listen stats 192.168.200.103:4711
    mode http
    stats enable
    stats hide-version
    stats uri /

listen e2k13 192.168.200.103:443
    mode tcp
    option ssl-hello-chk
    option http-keep-alive
    balance roundrobin
    stick-table type ip size 20k expire 15m
    stick on src
    timeout server 1m
    timeout connect 1m
    timeout client 5m
    server exchange1 192.168.200.100:443 check
    server exchange2 192.168.200.102:443 check
Nothing fancy. 192.168.200.103 is the IP of my CentOS 7 VM. 192.168.200.100 and 192.168.200.102 are two Exchange 2013 servers (CAS & Mailbox). To get some stats, I added the listen stats section to my config. Please note, that this config passes HTTPS traffic to the backend servers! SSL traffic is not terminated at the HAProxy itself. Therefore you need valid certificates on all of your client access servers. When you finished your config, you can start the HAProxy and check the success with netstat.
[root@haproxy ~]# systemctl start haproxy.service
[root@haproxy ~]# netstat -tulpen
Active Internet connections (only servers)
Proto Recv-Q Send-Q Local Address           Foreign Address         State       User       Inode      PID/Program name
tcp        0      0 127.0.0.1:25            0.0.0.0:*               LISTEN      0          15431      1309/master
tcp        0      0 192.168.200.103:443     0.0.0.0:*               LISTEN      0          29484      1979/haproxy
tcp        0      0 192.168.200.103:4711    0.0.0.0:*               LISTEN      0          29482      1979/haproxy
tcp        0      0 0.0.0.0:22              0.0.0.0:*               LISTEN      0          14752      812/sshd
tcp6       0      0 ::1:25                  :::*                    LISTEN      0          15432      1309/master
tcp6       0      0 :::22                   :::*                    LISTEN      0          14754      812/sshd
udp        0      0 0.0.0.0:5353            0.0.0.0:*                           70         13708      541/avahi-daemon: r
udp        0      0 0.0.0.0:42748           0.0.0.0:*                           70         13709      541/avahi-daemon:
You need to create DNS A-Records that points to the IP address of the HAProxy. Then add this A-Records as internal and external hostnames for the Exchange 2013 virtual directories. Here’s an example for Outlook Anywhere:
[PS] C:\windows\system32>Get-OutlookAnywhere | select servername, *hostname

ServerName                              ExternalHostname                        InternalHostname
---------- ---------------- ----------------
EXCHANGE1                               cas.terlisten-consulting.de             mail.vcloudlab.local
EXCHANGE2                               cas.terlisten-consulting.de             mail.vcloudlab.local
A change to the Outlook Anywhere config can take up to 15 minutes, until clients discover the change. As you can see, the client in my lab uses the internal hostname.

Patrick Terlisten/ vcloudnine.de/ Creative Commons CC0
Both Exchange servers receive requests. This is screenshot is taken from the HAProxy stats website (click to enlarge).
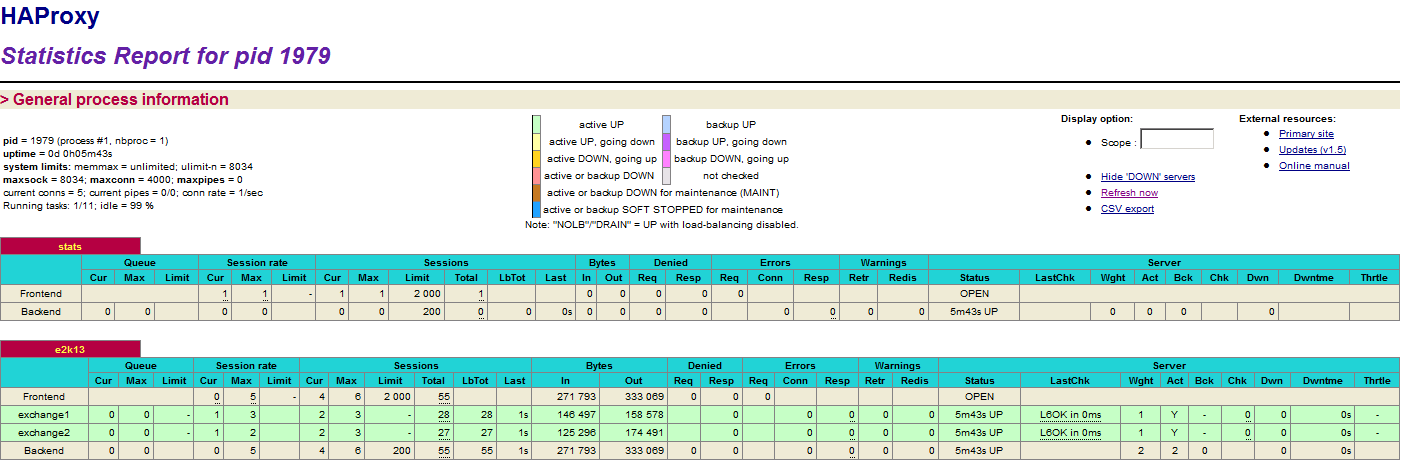
Patrick Terlisten/ vcloudnine.de/ Creative Commons CC0
Final words
I really like HAProxy. It’s perfect for lab environments or small deployments, not only to load balance HTTP/ HTTPS requests for Microsoft Exchange 2013.