
Once in a year: How to update TLS certificates on ADFS server and proxies
You might got this news some days ago: Starting with September 1, 2020, browsers and devices from Apple, Google, and Mozilla will show errors for new TLS certificates that have a lifespan greater than 398 days. Due to this move from Apple, Google and Mozilla, you have to deal with the replacement of certificates much more often. And we all know: Replacing certificates can be a real PITA!
Replacing TLS certificates used for ADFS and Office 365 can be a challenging task, and this blog post will cover the neccessary steps.
ADFS Server
The first service, for which we will replace the certificate, is the ADFS server, or the ADFS server farm. At this point it is important to understand that we are dealing with two different points to which the certificate is bound:
- the ADFS service communications certificate, and
- the ADFS SSL certificate
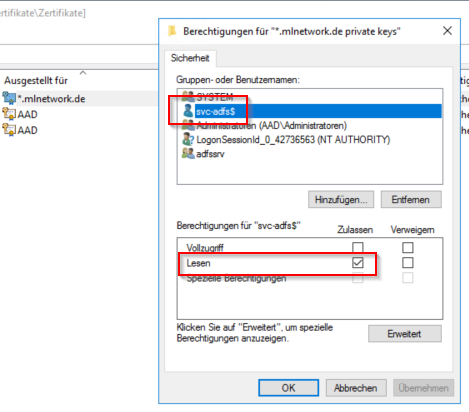
The first step is to replace the service communication certificate. After importing the certificate with private key, you need to assign “read” permission to the ADFS service account. Right click on the certificate, then “All Tasks” > “Manage Private Keys”.
Patrick Terlisten/ vcloudnine.de/ Creative Commons CC0
Make sure to import the certificate on all farm servers! Next step: Start the ADFS management console on the primary node. Select “Certificates” and then “Select service communication certificate” on the right window pane.
Now we have successfully replaced the service communication certificate. But we are no finished yet! Now we have to set the ADFS SSL certificate. Depending on your OS, you have to run the PowerShell command on the primary node. If your are running Windows Server 2012 R2 or older, you have to run the PowerShell command on EVERY ADFS farm server!
You can get the certificate thumbprint using the Get-AdfsSslCertificate command. Set the ADFS SSL certificate with
Set-AdfsSslCertificate -Thumbprint 07B3DFE31E020BFC3F3BDF1A0F61807223DBF125
Then restart the ADFS service.
Restart-Service adfssrv
ADFS Proxies
In most cases you will have one or more ADFS proxies in your DMZ. The ADFS proxy is nothing more than a Web Application Proxy (WAP) and therefore the PowerShell commands for WAP will be used.
First of all: Import the new certificate with the private key on all ADFS proxies, and then get the certificate hash of the new certificate. Then open an elevated PowerShell on each proxy.
Set-WebApplicationProxySslCertificate -Thumbprint 07B3DFE31E020BFC3F3BDF1A0F61807223DBF125
Then we have to re-establish the trust between the proxies and the primary ADFS farm server. You will need the local (!) administrator account of the primary farm server.
$cred = Get-Credential
Install-WebApplicationProxy -FederationServiceTrustCredential $cred -CertificateThumbprint 07B3DFE31E020BFC3F3BDF1A0F61807223DBF125 -FederationServiceName adfs.domain.tld
The last step is to update thefederated trust with Office 365.
Update the federated trust with Office 365
To update the federated trust with Office 365, you will need the Windows Azure Active Direcotry Module for Windows PowerShell and an elevated PowerShell. Connect to Office 365 and update the federated trust:
$cred = Get-Credential
Connect-MsolService -Credential $cred
Update-MSOLFederatedDomain –DomainName domain.tld
That’s it! Bookmark this page and set a calendar entry on today +12 months. :)