
Connect an on-premises network to Microsoft Azure with a site-2-site VPN
Building networks in the cloud is sometimes hard to understand. A common mistake is to believe that all VMs can talk to another, regardless of the owner, and that all VMs are available over the internet.
Some basics about Cloud Service Endpoints and Virtual Networks
When we talk about Microsoft Azure, a Cloud Service Endpoint is the easiest way to access one or multiple VMs. A Cloud Service contains resources, like VMs, and it’s acting as a communication and security boundary. All VMs that use the same Cloud Service get their IPs via DHCP and share the same private IP address range. The VMs can communicate directly to each other. To access these VMs over the internet, a Cloud Service Endpoint is used. Each Cloud Service has a internet addressable virtual IP address assigned. And that’s the Cloud Service Endpoint. With PAT, ports for RDP or PowerShell are forwarded to the VMs by default. If you deploy a webserver and an application server, both can be provisioned to the same Cloud Service and therefore, they share the same Cloud Service Endpoint. But you can only forward http traffic to the webserver. Therefore only the webserver is available over the internet, not the application server.
If you need more complex networking within Microsoft Azure, you may take a look at the Virtual Networks (VNets). VNets are used to create and manage isolated networks within Microsoft Azure. Each VNet has its own choosable IP address range. VNets can be linked to other VNets and on-premises networks using VPN techniques. VNets allow you to assign “your own” IP addresses to VMs. To be honest: You can define “your own” IP subnet, but even with Set-AzureStaticVNetIP, you can’t assign a real static IPs to those VMs. It’s more a kind request to get the same IP everytime the VM boots up.
With VNets you can extend your on-premises network to Microsoft Azure. You can deploy test and development environments to Microsoft Azure and connect to the used VNets using IPsec. Or you can run you whole datacenter within Microsoft Azure and only have PCs and laptops on-premises.
Connect a on-premises network to Microsoft Azure
In this blog article, I’d like to show you how you connect your on-premises network to a Microsoft Azure Virtual Network. In this case, I used my AVM FRITZ!Box 7270 as the VPN gateway in my on-premises network. Many well-known manufacturers are listed on the compatibility list.
The very first step is to create a Virtual Network (VNet) in the Microsoft Azure portal. Select “NETWORKS” from the left panel and create a new VNet.
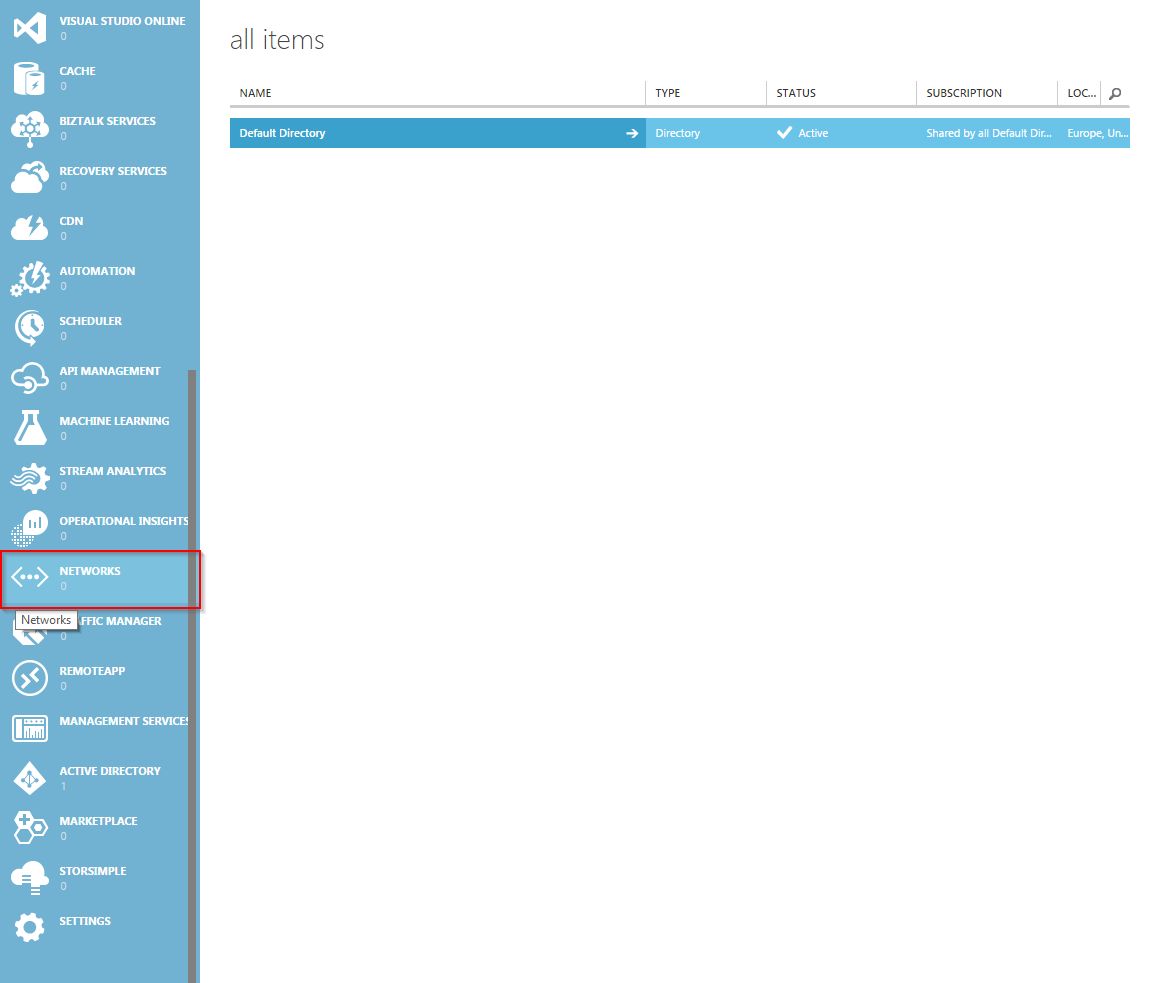
Patrick Terlisten/ vcloudnine.de/ Creative Commons CC0
You should assign a descriptive name to your VNet. Just an information: The datacenter for the local “West Europe” is located in the Netherlands. Currently there is no datacenter in Germany.
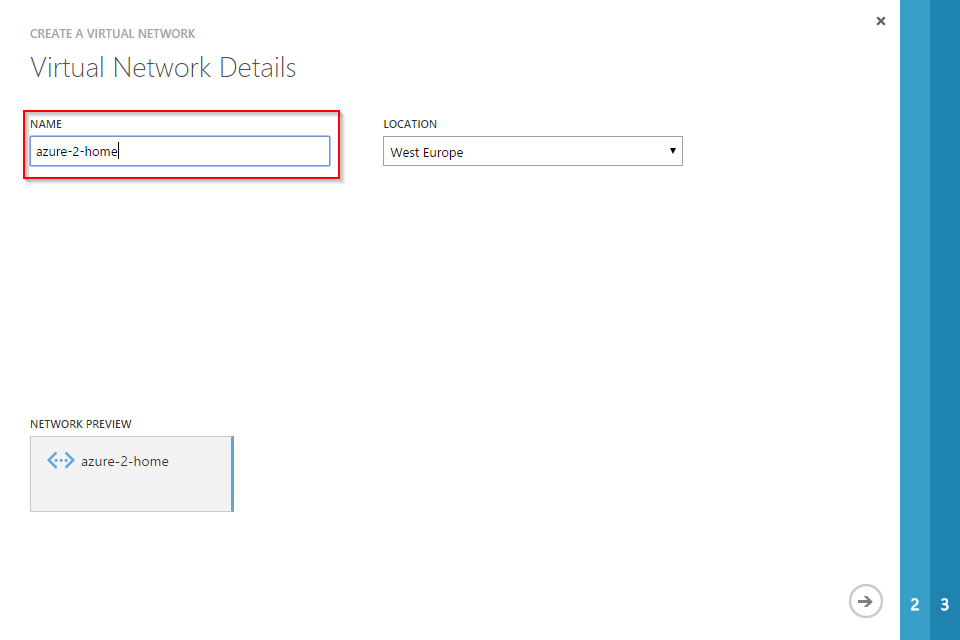
Patrick Terlisten/ vcloudnine.de/ Creative Commons CC0
If you have a DNS server in your local network, you can add it in step two of the “Create a Virtual Network” wizard. Make sure that you select the “Configure a site-to-site VPN” checkbox. Otherwise you can’t create a IPsec tunnel.
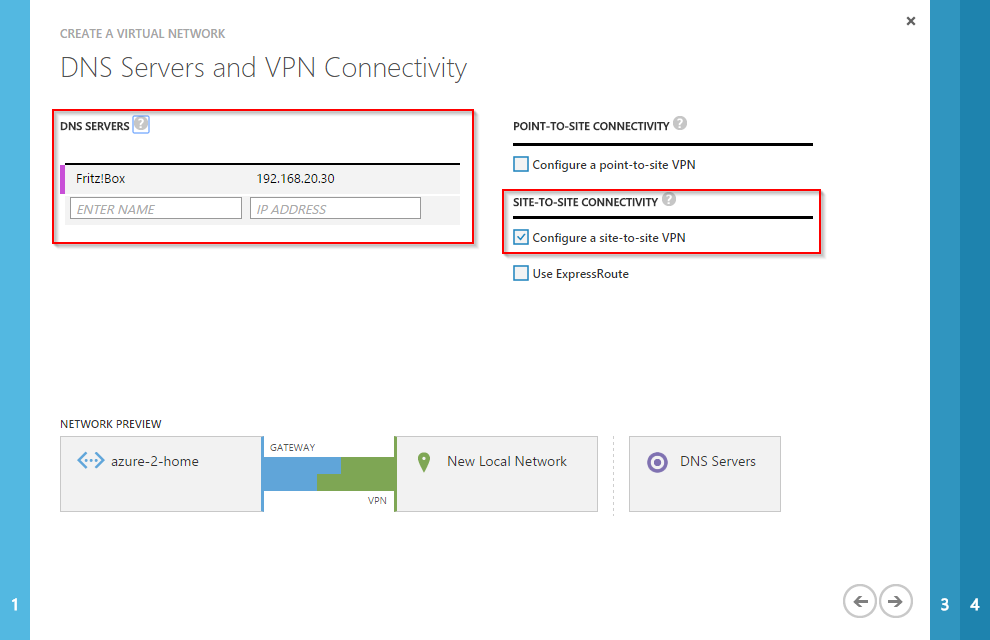
Patrick Terlisten/ vcloudnine.de/ Creative Commons CC0
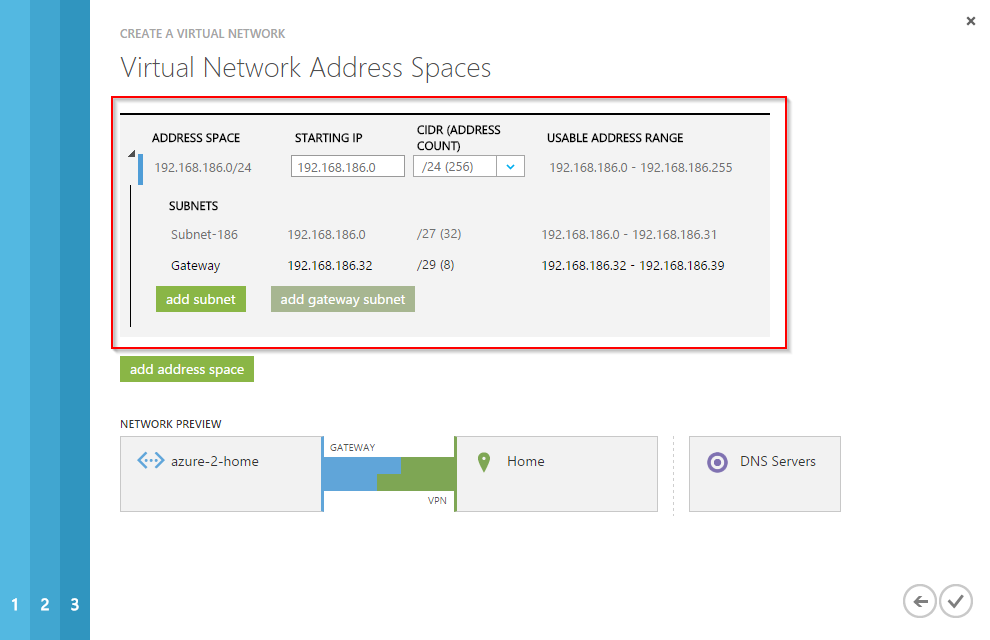
In the third step, you have to enter details about your on-premises network and the VPN device. The VPN device address is the public address of your VPN gateway. You have to use an IP address here. You can’t use a FQDN. So make sure that you have a static IP address! I don’t have one. This means that I have to change my VNet config each time my public IP changes (all 24h). Enter the address spaces of your local IP subnets.
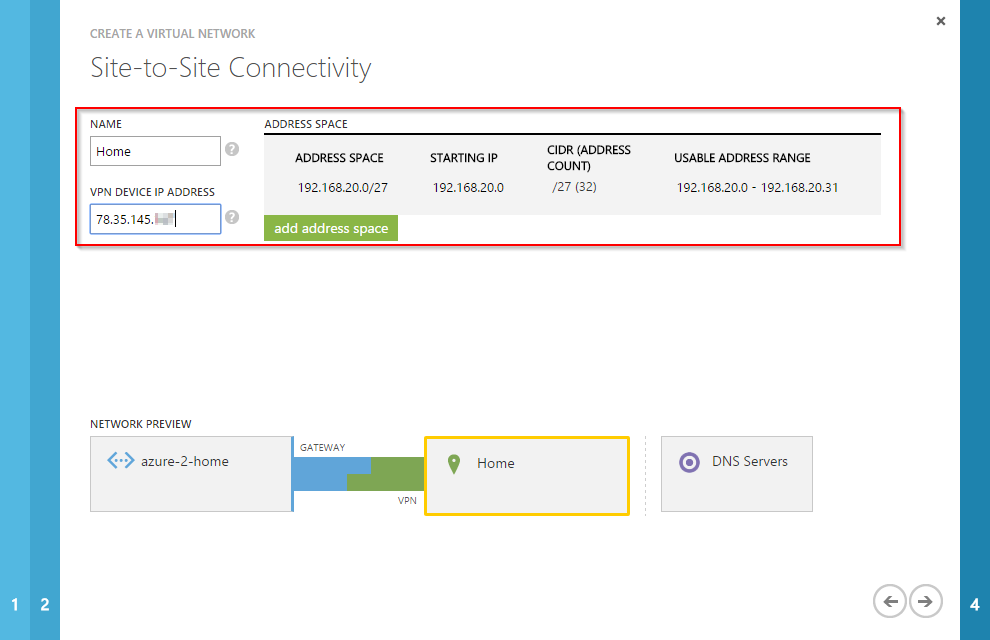
Patrick Terlisten/ vcloudnine.de/ Creative Commons CC0
The “Virtual Network Address Space” defines the IP subnet which should be used for the VMs that will be provisioned to this VNet. And you have to add a subnet for the gateway. The gateway subnet is used for the IPsec connection. Please note that this subnet can’t be used for VMs.
Patrick Terlisten/ vcloudnine.de/ Creative Commons CC0
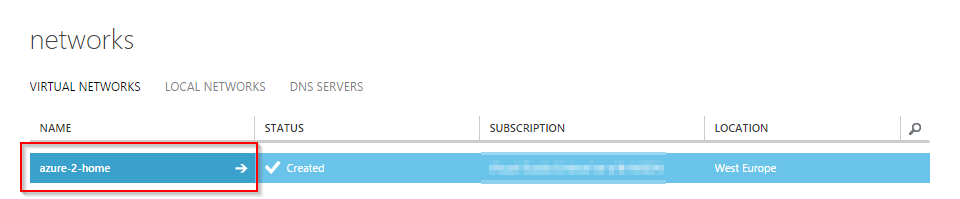
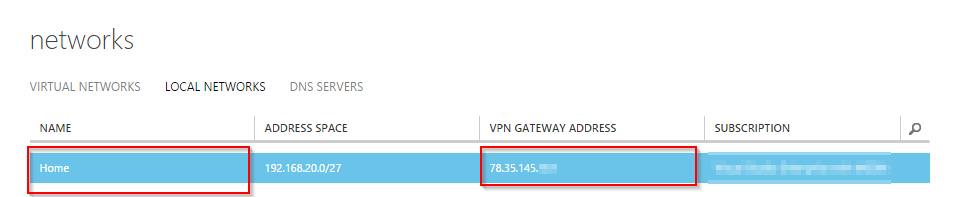
The creation of the VNet takes some time. After a couple of minutes you should be able to click on “VIRTUAL NETWORKS”, “LOCAL NETWORKS” and “DNS SERVERS” and you should see the values you’ve entered.
Patrick Terlisten/ vcloudnine.de/ Creative Commons CC0
In the “LOCAL NETWORKS” section you can see the address space of your local network, as well as the IP of your VPN gateway. If you don’t have a static IP address, you have to change the VPN gateway address here everytime the IP address changes.
Patrick Terlisten/ vcloudnine.de/ Creative Commons CC0
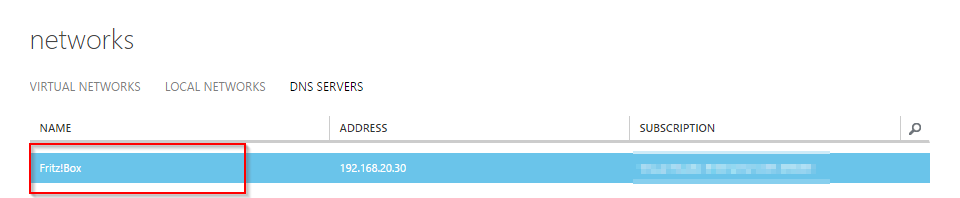
Last but not least: The DNS server of your local network.
Patrick Terlisten/ vcloudnine.de/ Creative Commons CC0
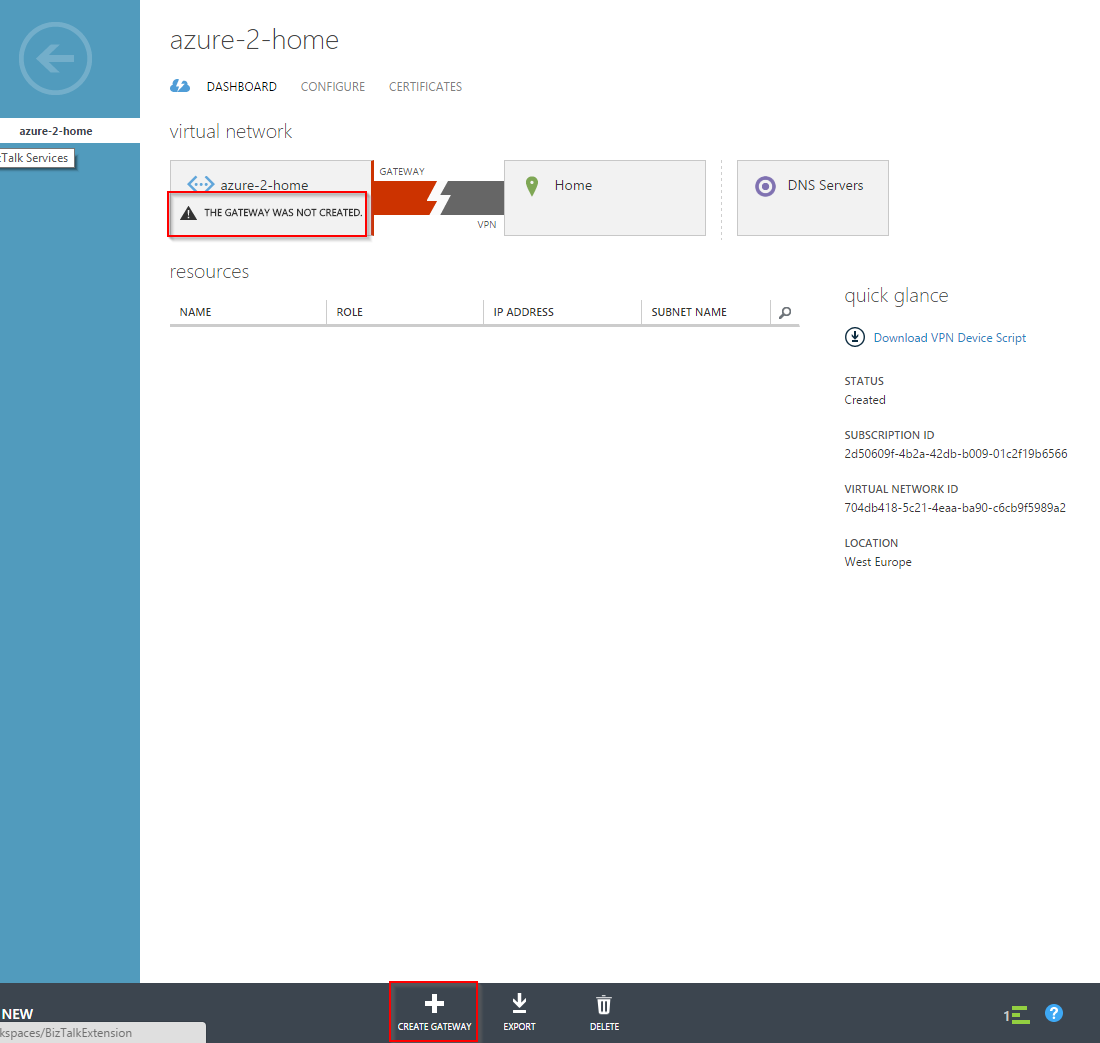
The next step is to create a gatway. The gateway is necessary for the IPsec connection. Click on “CREATE GATEWAY”.
Patrick Terlisten/ vcloudnine.de/ Creative Commons CC0
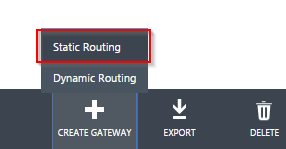
Select “Static Routing”. That’s all. The creation of the gatway will take some time. I had to wait about 5 minutes until the gateway was created.
Patrick Terlisten/ vcloudnine.de/ Creative Commons CC0
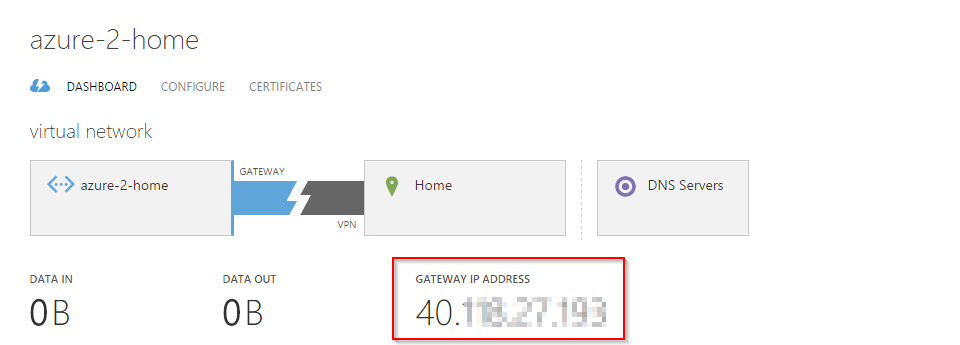
After the creation of the gateway, you should see the gateway IP address. This address is the VPN endpoint from the perspective of your local network.
Patrick Terlisten/ vcloudnine.de/ Creative Commons CC0
Beside the gateway IP address, you also need the shared key to create an IPsec tunnel. Click on “MANAGE KEY” to get the pre-shared key.

Patrick Terlisten/ vcloudnine.de/ Creative Commons CC0
Copy the pre-shared key and save it for later use.

Patrick Terlisten/ vcloudnine.de/ Creative Commons CC0
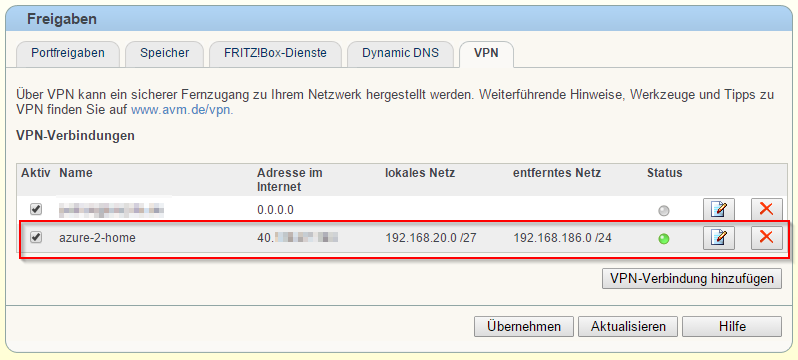
Now the configuration of the VNet is finished. Now it’s time to configure your on-premises VPN gateway. In my case it’s a AVM FRITZ!Box which isn’t listed on the compatible device list. You have to create and import a config file. This is the config file I’ve used. I highlighted the parts of the config that you have to modify. Please note, that previously created VPN connections may be deleted if you import this file. If you have additional VPN connections configured on your FRITZ!Box, please make sure that you add them to this file BEFORE you import it.
/*
 * VPN Config file for
 * AVM FRITZ!Box
 */

vpncfg {
        connections {
                enabled = yes;
                conn_type = conntype_lan;
                name = "azure-2-home"; /* change this name
                always_renew = no;
                reject_not_encrypted = no;
                dont_filter_netbios = yes;
                localip = 0.0.0.0;
                local_virtualip = 0.0.0.0;
                remoteip = 40.xxx.xxx.xxx; /* the gateway IP address from your Microsoft Azure Gateway
                remote_virtualip = 0.0.0.0;
                localid {
                        ipaddr = 78.xxx.xxx.xxx; /* your local VPN gateway IP address
                }
                remoteid {
                        ipaddr = 40.xxx.xxx.xxx; /* the gateway IP address from your Microsoft Azure Gateway
                }
                mode = phase1_mode_aggressive;
                phase1ss = "all/all/all";
                keytype = connkeytype_pre_shared;
                key = "FcYKsPLpeDFxxxxxxxxxxxxxxxxxxxxxxx"; /* the PSK
                cert_do_server_auth = no;
                use_nat_t = yes;
                use_xauth = no;
                use_cfgmode = no;
                phase2localid {
                        ipnet {
                                ipaddr = 192.168.20.0; /* your local subnet
                                mask = 255.255.255.224; /* your local subnet mask
                        }
                }
                phase2remoteid {
                        ipnet {
                                ipaddr = 192.168.186.0; /* the virtual address space
                                mask = 255.255.255.0; /* the corresponding subnet mask
                        }
                }
                phase2ss = "esp-all-all/ah-none/comp-all/no-pfs"; /* change pfs to no-pfs
                accesslist = "permit ip any 192.168.186.0 255.255.255.0"; /* change to your virtual address space
        }
        ike_forward_rules = "udp 0.0.0.0:500 0.0.0.0:500",
                            "udp 0.0.0.0:4500 0.0.0.0:4500";
}

// EOF
You can use my config as a template for your VPN config. Simply change the highlighted values, remove the comments and import it into your FRITZ!Box. Don’t forget to remove the comments in the config file. Don’t remove the comments at the beginning of the file. Only remove the comments I added to highlight the values you have to change. If everything’s fine, the IPsec tunnel should be established within a couple of seconds.
Patrick Terlisten/ vcloudnine.de/ Creative Commons CC0
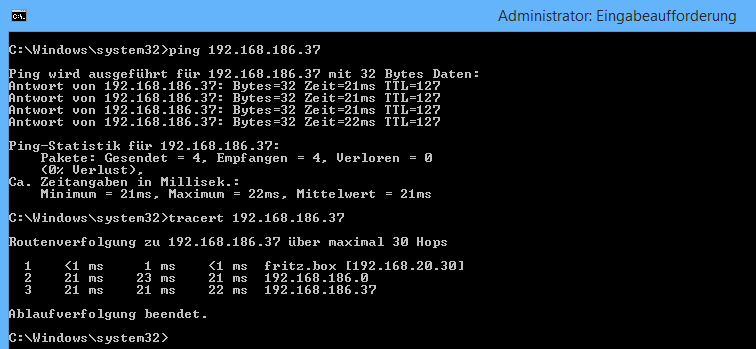
As soon as the IPsec tunnel is established, you should be able to ping the gateway IP address. In my case it’s the IP address 192.168.186.37.
Patrick Terlisten/ vcloudnine.de/ Creative Commons CC0
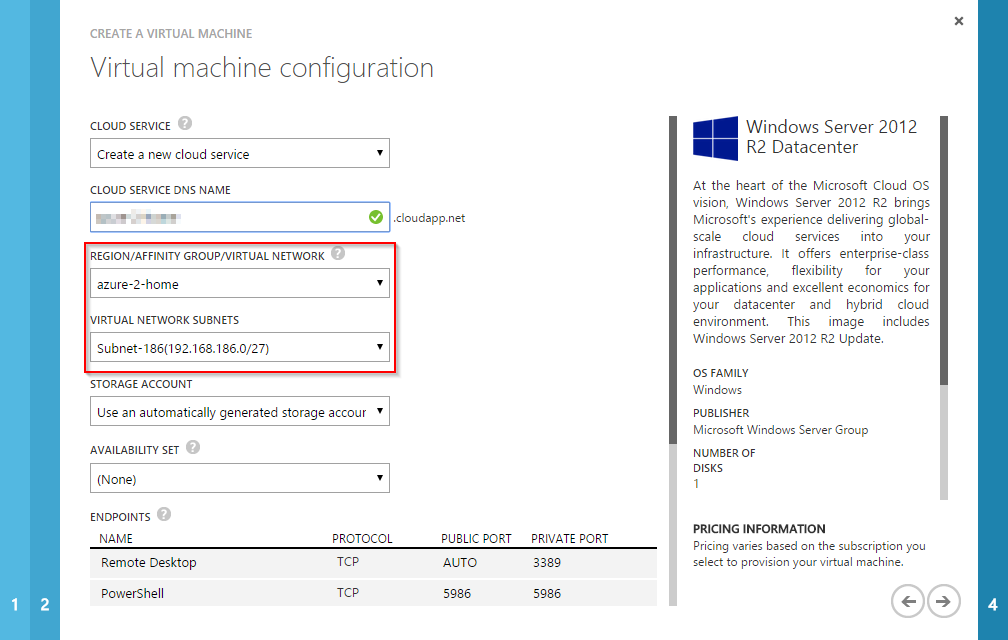
If you create a new Azure VM, you can now use your newly created VNet and subnet. Simply choose the VNet from the “REGION/ AFFINITY GROUP/ VIRTUAL NETWORK” drop down menu.
Patrick Terlisten/ vcloudnine.de/ Creative Commons CC0
The first VM will get the IP address 192.168.186.4. Why the .4 when the first usable address is .1? The first four IP addresses of the address space are reserved. So the first usable IP address is 192.168.186.4. The second VM will get the 192.168.186.5 and so on. The same applies to the gateway address space.
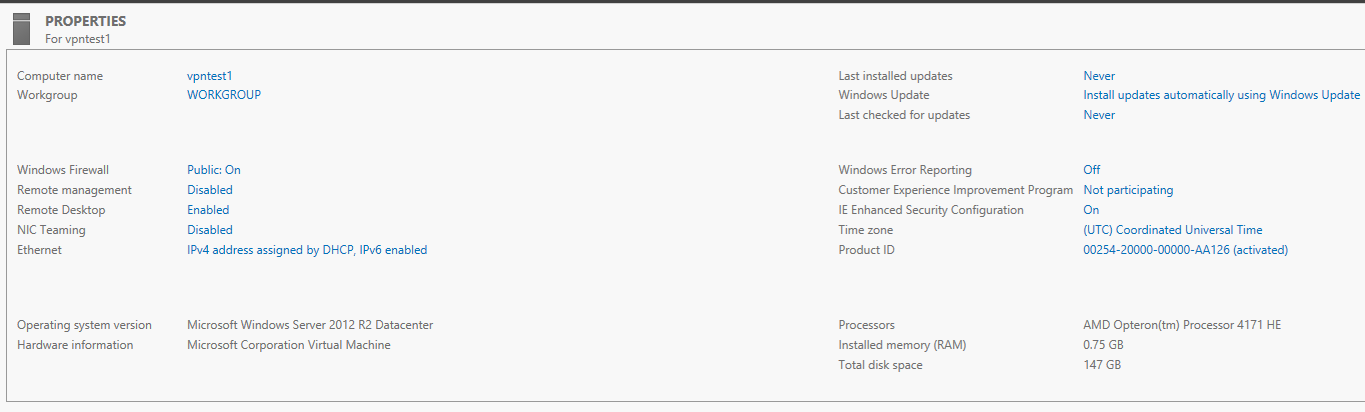
Now, with a working IPsec tunnel to my VNet, I can open a RDP connection to my newly created VM using the IP address 192.168.186.4. And there it is:
Patrick Terlisten/ vcloudnine.de/ Creative Commons CC0
If you connect your on-premises network to Microsoft Azure, you should know that you can use up to 80 Mbps with an availability SLA of 99.9% and no performance commitment! If you need more bandwidth, you can use a High Performance Gatway which can deliver up to up to 250 Mbps.
I would recommend to use VNets whenever it’s possible. Not only in case of connecting a on-premises network. If you wish to use VPN features, take a look at the VPN gateway compatibility list! Otherwise, the connecting your on-premise network to Microsoft Azure might be a bit fiddly.