
Getting started with the Microsoft Graph PowerShell SDK
There is a new API in town… naa, not really new, but the Microsoft Graph API will replace most, if not all, other Azure AD/ Microsoft 365 APIs. Actually, Microsoft has planned to retire Azure AD Graph API and ADAL in Juni 2022. Now they have postponed this date to somewhere after December 2022. This will give you some extra time to refactor your PowerShell scrips and move them to use the PowerShell SDK for Graph.
What is Microsoft Graph? Microsoft Graph is the spider web that connects everything in Microsoft 365. One part of Graph is a single and unified API endpoint, which allows you to access and manage Azure AD and Microsoft 365 services, such as Teams and Exchange Online, Intune etc.

Microsoft/ microsoft.com
Source: Microsoft
Instead of different endpoints, the Graph API uses a single endpoint (https://graph.microsoft.com/v1.0), which is the pretty nice thing if it comes down to Firewall rules and traffic management. This single endpoint, together with a single access token, allows you to manage all M365 services using REST API calls. So you don’t have to use the PowerShell SDK, you can also use Python or curl. Furthermore, the Microsoft Graph PowerShell SDK is Open Source, it offers cross-platform support (Linux, MacOS, Windows), and its available on PowerShell 5.1 nd above. This is a pretty important thing for me. Now I can use a single PowerShell Module to manage all my M365 services. This was PITA in the past. Depending on the service, I had to use different PowerShell modules, and I had to switch between PowerShell and PoSh Core.
Install the Microsoft Graph PowerShell SDK
The installation is pretty simple. All you need is
- at least PowerShell 5.1 or later,
- .NET 4.7.2 or later, and
- the PowerShell script execution policy must be set to
remote signedor a less restrictive execution policy
The installation is done by calling Install-Module.
Install-Module Microsoft.Graph -Scope CurrentUser
Sure, you can also use -Scope AllUsers, but I prefer to install PowerShell modules in my CurrentUser context. That’s it! Now let’s authenticate to the Graph API.
Authentication & Authorization
First of all: The Graph API knows two types of authentication:
- delegated access, and
- app-only access
Delegates access allows an application to act as a specific user, where as application access allows an application to act as its own entity. If you want that an API call is executed with the users permissions, then you should use delegated access. If you want to run scripts, or a service, then you want to use app-only access. Some API call are only possible with delegated access, some calls can only be made with app-only access, and some calls can be made with either of the two methods.
As part of the login process, you must define the requested permission scope. This is to ensure that the least possible privileges are used. For example:
Connect-MgGraph -Scopes "User.Read.All","Group.ReadWrite.All"
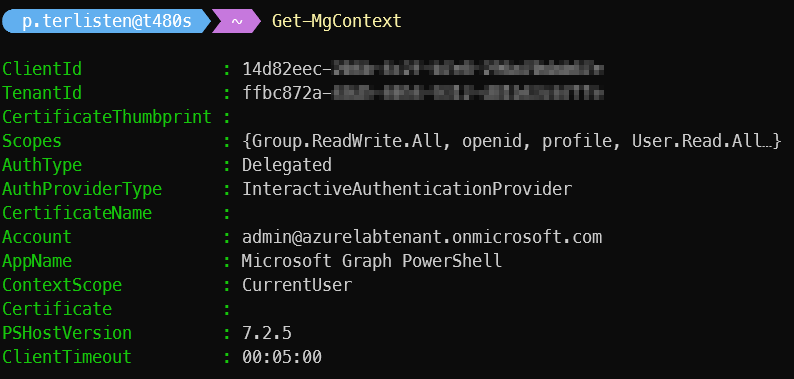
As you can see, this command will open a connection to the Graph API and you must consent the requested permissions after entering valid user credentials. Side note: Graph offers all the modern authentication stuff that we want to use today.

Patrick Terlisten/ vcloudnine.de/ Creative Commons CC0
The tenant is specified by the singed-in user. If you want to connect to a specific tenant (to avoid usage of a cached access token), then you can add –TenantId <TenantId> to the command above.
As you can see, I now have a working connection using the Graph API using delegated access and with the requested permission scopes.
Patrick Terlisten/ vcloudnine.de/ Creative Commons CC0
This map of Azure AD and MSOnline cmdlets was pretty helpful when playing around with Graph.
If you want to run a script, you might want to register an app in your tenant. This allows you to define the required permission scopes as properties of the app itself. I will show this in a separate blog post. This blog post will also cover the certificate-based authentication, as well as the authentication using a client secret.