
HPE Data Protector VE Integration/ VMware best practice
The Virtual Environment Integration (VE Integration) provides protection of VMs in virtual server environments. It is used o integrate HPE Data Protector with various virtualization environments, currently VMware vSphere and Microsoft Hyper-V. For Citrix XenServer is a script solution available. I will focus on VMware vSphere.
What is possible?
I took this table from the “HPE Data Protector 9.00 Integration Guide for Virtualization”.
| Feature | VE Integration |
|---|---|
| Online backup | ✓ |
| Crash-consistent backup | ✓ |
| Application-consistent backup | ✓ |
| Granularity | vmdk, vmx |
| Full/ Incremental/ Differential | ✓/ ✓/ ✓ |
| Support for changed block tracking (CBT) | ✓ |
| Where does the Data Protector component need to be installed? | backup host |
| Extra licenses needed | 1x On-Line Extension per ESXi host |
As you can see, Data Protector offers all you need to create a crash-consistent backup of your VMs. HPE Data Protector relies on the VMware vSphere Storage APIs – Data Protection (formerly known as VMware vStorage APIs for Data Protection or VADP). Data Protector has to use the same API as Veeam, CommVault Simpana or any other product that can be used to backup VMs in a VMware vSphere environment. Therefore, most software products offer the same features.
How does it work?
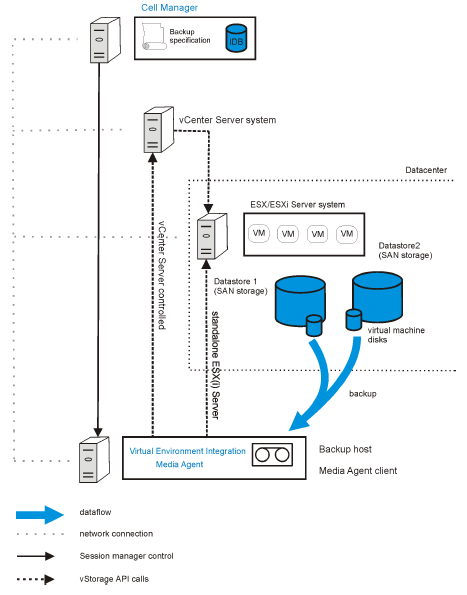
HPE Data Protector uses the vStorage Image backup method to create a crash-consistent backup of your VMs. With this method, a backup host is used to create a backup of VMs hosted on a single or multiple ESXi hosts. The backup host can be a dedicated physical host, a virtual machine, or the Cell Manager (CM) itself (physical or virtual). All you need to make sure is, that the Data Protector Virtual Environment Integration component (VEAgent) is installed. During a vStorage Image backup, the VEAgent
- establishes a connection between the backup host and the ESXi or vCenter server (depending if it’s a standalone host or a vCenter environment)
- locks the VM, so that it can’t be migrated off the host by VMware vMotion
- requests a snapshot of the VM
- reads the VM data across LAN or SAN
- initializes the Media Agent (MA) and controls the transfer of the data to to backup device
After finishing the backup of the VM, the snapshot is released and the VM is unlocked. I took this picture from the “HPE Data Protector 9.00 Integration Guide for Virtualization” to illustrate the data flow and what components interact with each other.
Patrick Terlisten/ vcloudnine.de/ Creative Commons CC0
If Data Protector requests the creation of a snapshot, the snapshot is always named _DP_VEPA_SNAP_. I often use this simple PowerCLI one-liner to search orphaned VEAgent snapshots:
Get-VM | Get-Snapshot | ? {$_.name -match '_DP_VEPA_SNAP_'} | Format-Table -Property VM,Created,SizeGB
To be honest: Orphaned snapshots only occur if a VEAgent backup failes before Data Protector can delete the snapshot. So an orphaned snapshot indicates some kind of failure during the backup. The number of snapshots that remain in the snapshot chain after a backup depends on three factors:
- Wheather CBT is used or not
- Selected snapshot handling mode
- Backup type specified
The snapshot, that remain in a snapshot chain play a great role for incremental and differential VM backups. Data Protector can detect changes on
- file level, or at
- block level
Without CBT, Data Protector uses snapshots to identify changes on file level. With CBT, Data Protector identifies changes on block level. With CBT, the number of snapshots remaining after a backup is always 0. Without CBT, Data Protector keeps up to 2 snapshots (mixed snapshot handling). You must not delete these snapshots. Otherwise a full backup of a VM is necessary to create a new, valid backup chain.
Even if CBT is enabled, Data Protector requests the creation of a snapshot to get a consistent state of the VM. Because of this, a VM backup requires sufficient free disk space on the datastore where the VMDKs of the VM reside. The longer a backup takes, and the more changes are made, the bigger the snapshot gets. Here comes the free space required option into play. You can specify the amount of free disk space, that must be available at the start of the backup, e.g. 10% or 20%. The required free space is calculated based on the size of VMDKs of a VM just before the snapshot is created. Data Protector checks all datastores where the virtual machine disks reside. If a VM has a 100 GB VMDK and you set the free space required option to 10%, at least 10 GB free disk space is required in each datastore, where the VM has VMDKs located. The check is per VM!
By default, VMs are backed up in parallel. This greatly improves the overall backup performance. But in rare cases it can lead to problems. You can disable parallel backups by adding
OB2_VEAGENT_THREADED_BACKUP = 0
to the omnirc on the VEAgent backup host.
By default, a maximum of 10 concurrent threads are executed when backing up VMs using the VEAgent integration. This os good for the backup performance, but it also places load on the infrastructure. You can change this by adding the OB2_VEAGENT_VCENTER_CONNECTION_LIMIT variable to the omnirc on the VEAgent backup host.
I had several cases where VEAgent backups failed because the VEAgent (vepa_bar.exe) or the Backup Media Agent (bma.exe) failed with a memory dump during the backup, or during the initial environment discovery. In all cases, the VEAgent, the MA and the CM were located on a single physical host. This is highly not recommended according to the Data Protector Support. A possible solution is to deploy a Windows Server VM and push the VEAgent onto it. You can use this VM as VEAgent backup host, and the physical host acts only as MA and CM.
With the OB2_VEAGENT_BACKUP_DISK_BUFFER_SIZE option, you can modify the buffer size used during the backup. The SAN and the HotAdd transport mode support disk buffer sizes from 1 MB to 256 MB. By default, they use 8 MB disk buffers. The NBD and NBDSSL transport are always using 1 MB. Using bigger disk buffer sizes can improve the backup performance, but it also increases the memory consumption.
On Windows VMs it is possible to use Volume Shadow Copy Service (VSS) to quiesce the states of the applications running within a virtual machine before a snapshot is created. A ZIP archive is created that contains all the BCD and writer manifests. Please note that quiescence can slow down the performance of a backup sessions considerably.
TL;DR
During my last projects, I collected a number of common or best practices. I provide this “AS IS” with no warranties! Thanks to the HPE Data Protector support team for helping me during several support cases. Special thanks to Dimitar, Jose, Zhulien and Stephen!
Use multiple, smaller jobs instead of a few, bigger jobs
You should use jobs with a maximum of 30 VMs. Try to keep the size of a backup equal, but don’t add more than 30 VMs into a single job. If a job fails, you have to restart the job for 30 VMs, not for 200 or more VMs. With more jobs, you can execute jobs in parallel.
Use different hosts as Cell Manager, Media Agent and VEAgent
You shouldn’t combine CM, MA and VEAgent on a single physical or virtual server. Try to separate at least the VEAgent backup host. You can use a VM for this.
If you had to pack all services on a single server, reduce the load
Use OB2_VEAGENT_THREADED_BACKUP, or OB2_VEAGENT_VCENTER_CONNECTION_LIMIT, and/ or reduce the number of running MAs.
Always try to utilize CBT
Whenever possible, use CBT instead of single or mixed snapshot handling.
Use SAN Transport
Whenever possible, use SAN transport. If you can utilize SAN transport, try to use a virtual VEAgent backup host. In this case Data Protector will use HotAdd transport mode.
In case of StoreOnce: Single Object per Store Media
If you use a StoreOnce appliance (or a StoreOnce Software store), make sure that you have enabled “Single Object per Store Media”. I wrote a blog post about it: HPE Data Protector & StoreOnce Catalyst: Single Object per Store Media