
Simulate ONTAP 8 - An introduction
While talking with a colleague, she told me that she would like to know more about NetApp. Unfortunately we don’t have a NetApp system in our lab and playing with customer equipment is… mmh…unfavorable. But there’s a solution for this problem: Simulate ONTAP 8. This software allows you to simulate a 7-Mode or Cluster-Mode (c-Mode) system and to test many of the features. All you need is a VMware Workstation/ Player/ Fusion or an ESXi host.
The requirements
The requirements are manageable:
- Dual core x64 laptop or desktop with Intel VT support
- 2 GB RAM for one instance
- 40 GB free disk space per instance (SSD strongly recommended)
- at least VMware Workstation 8.0.1 or 8.0.2, VMware Player 4.0.1 or 4.0.2, or VMware ESX 4.1 U1
If you have a Mac, you need at least Mac OS X 10.6.8 and VMware Fusion 4.1.1. If your laptop or desktop has enough power, you can run multiple instances of the simulator (especially if you want to test NetApp c-Mode).
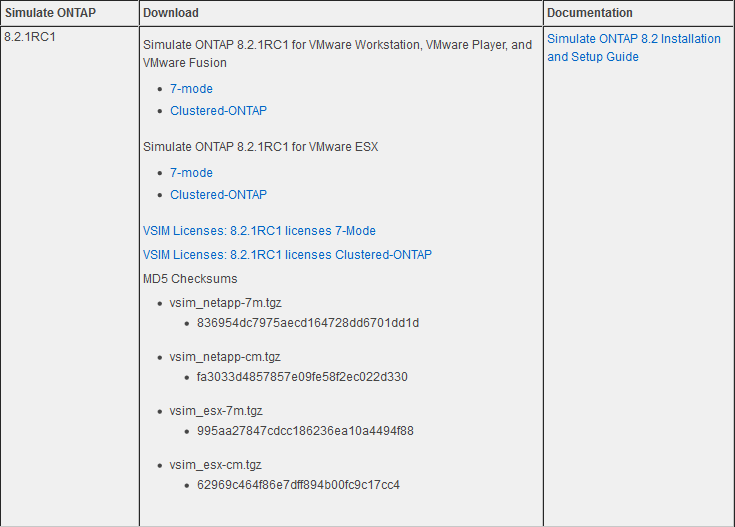
The software is available through NetApp NOW. The latest release is 8.2.1RC1. Take care that you grab the correct download. There are different downloads for Workstation/ Player/ Fusion/ ESXi and 7- and c-Mode.
NetApp/ netapp.com
To download the software, you need a NetApp NOW login. This is mandatory, because due to license restrictions the ONTAP 8 simulator can only be downloaded by NetApp customers and selected partners.
The installation
In this article I show you the installation of a 7-Mode ONTAP simulator on a standalone ESXi 5.5. After downloading the right file (vsim_esx-7m.tgz) you need to extract the file. This can be easily done with 7-Zip or any other tool, that can extract TGZ (gzip compressed TAR) files. The installation is a bit different, because the ONTAP 8 simulator isn’t delivered in OVF or OVA format. So you have to upload the files with the Datastore Browser of the vSphere C# Client (it’s a standalone ESXi 5.5, so no vCenter and Web Client).
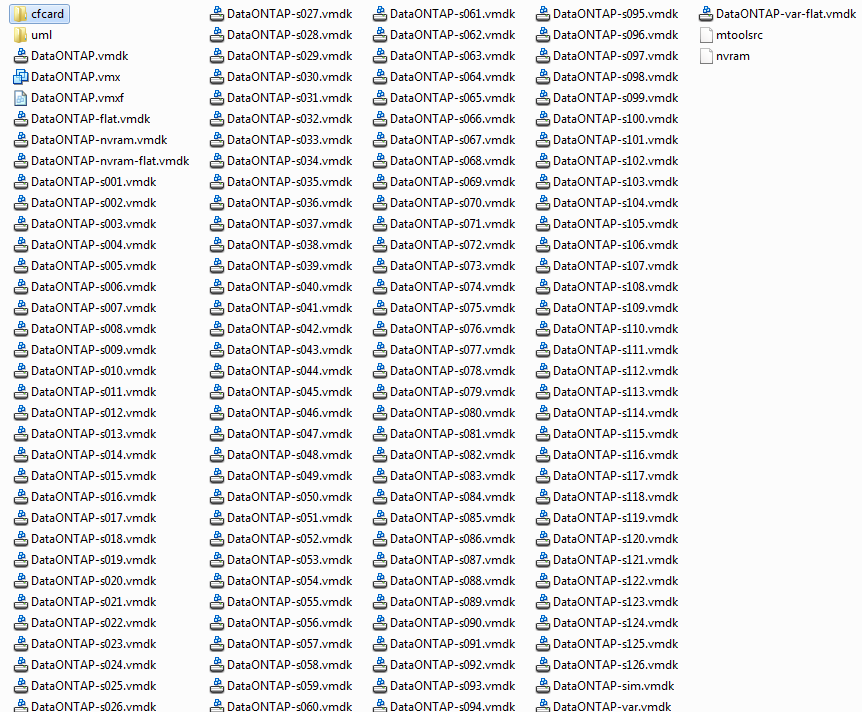
I extracted the TGZ into a folder named “netapp1”. As you can see, the VM consists from a lot of VMDK files. This is a problem, but I will come back to this later.
Patrick Terlisten/ vcloudnine.de/ Creative Commons CC0
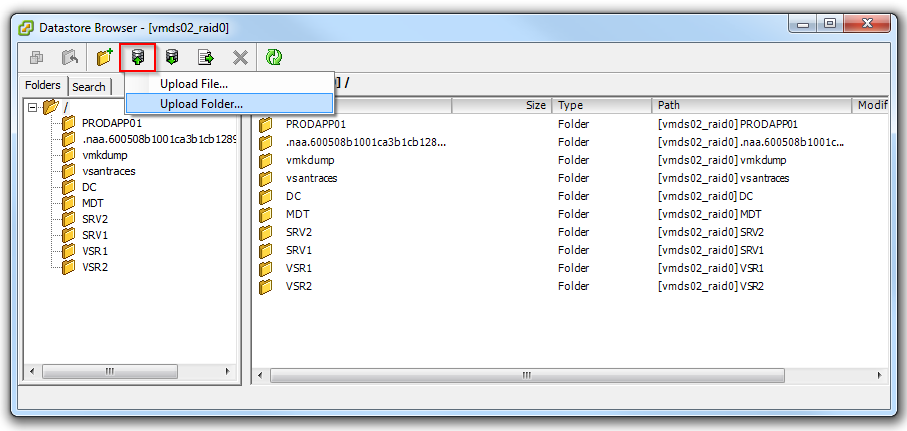
First of all you have to upload the folder to the a datastore. To do so, start the vSphere C# Client and open the datastore browser for the datastore, which should house your ONTAP 8 simulator. Select “Upload Folder…” and select the folder with the extracted ONTAP 8 simulator.
Patrick Terlisten/ vcloudnine.de/ Creative Commons CC0
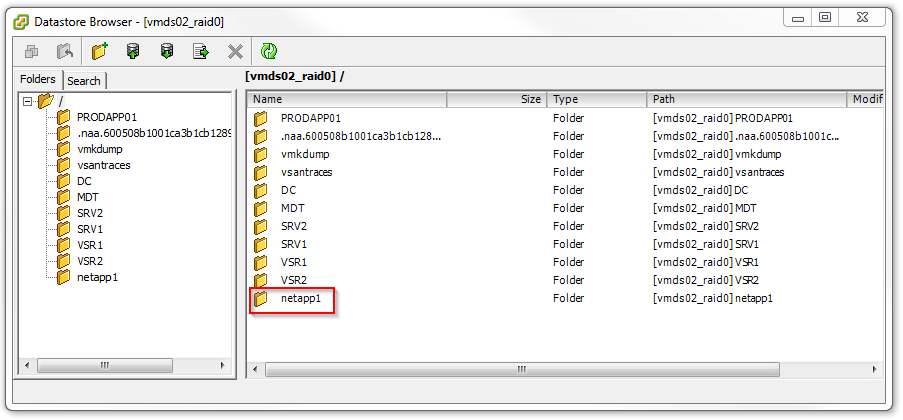
After the upload has finished, your datastore includes the folder with the ONTAP 8 simulator.
Patrick Terlisten/ vcloudnine.de/ Creative Commons CC0
Before we can proceed further, we have to do some magic mojo. The “DataONTAP-sim.vmdk” is a twoGbMaxExtentSparse VMDK. With ESXi 5.1 and later, the hypervisor can’t open this VMDK type by default. You can load the multiextent module to solve this problem, but you have to load the module after each reboot. The better way is to convert the VMDK into a zeroedthick VMDK. Open a SSH connection to your ESXi (remember to start the SSH service…). Change to the folder of your ONTAP 8 simulator and load the multiextent module. Otherwise we can’t convert the VMDK.
~ # cd /vmfs/volumes/vmds02_raid0/netapp1/
/vmfs/volumes/4fede405-.../netapp1 # vmkload_mod multiextent
Module multiextent loaded successfully
Now we can convert the VMDK with vmkfstools.
/vmfs/volumes/4fede405-.../netapp1 # vmkfstools -i DataONTAP-sim.vmdk DataONTAP-sim-copy.vmdk -d zeroedthick
Destination disk format: VMFS zeroedthick
Cloning disk 'DataONTAP-sim.vmdk'...
Clone: 100% done.
The last step is to remove the old VMDK, rename the new VMDK to the old name and unload the multiextent module.
/vmfs/volumes/4fede405-.../netapp1 # vmkfstools -U DataONTAP-sim.vmdk
/vmfs/volumes/4fede405-.../netapp1 # vmkfstools -E DataONTAP-sim-copy.vmdk DataONTAP-sim.vmdk
/vmfs/volumes/4fede405-.../netapp1 # vmkload_mod -u multiextent
Module multiextent successfully unloaded
Now it’s time to register the VM. To do so, browse through the datastore browser and right click the VMX file. Choose “Add to Inventory”.
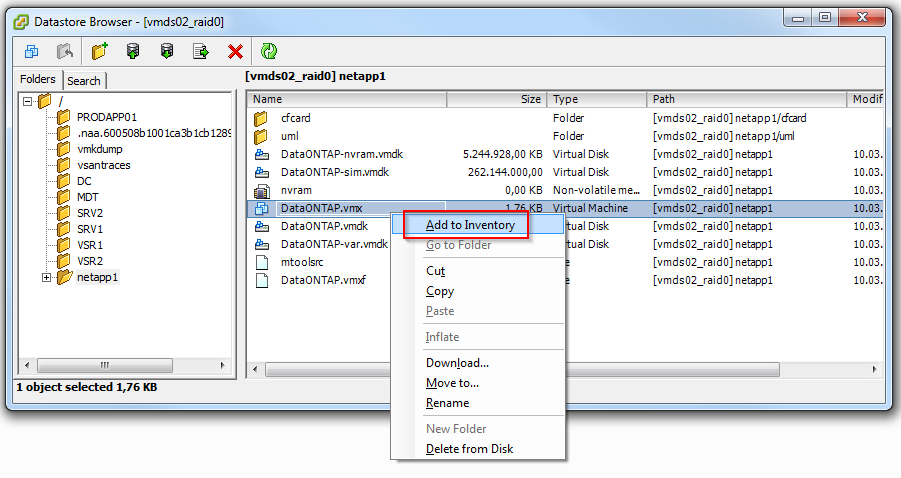
Patrick Terlisten/ vcloudnine.de/ Creative Commons CC0
Before you can start the VM, you have to change the vNICs. You have to configure them to the port groups on your ESXi host. I connected all four vNICs to my testlab network.
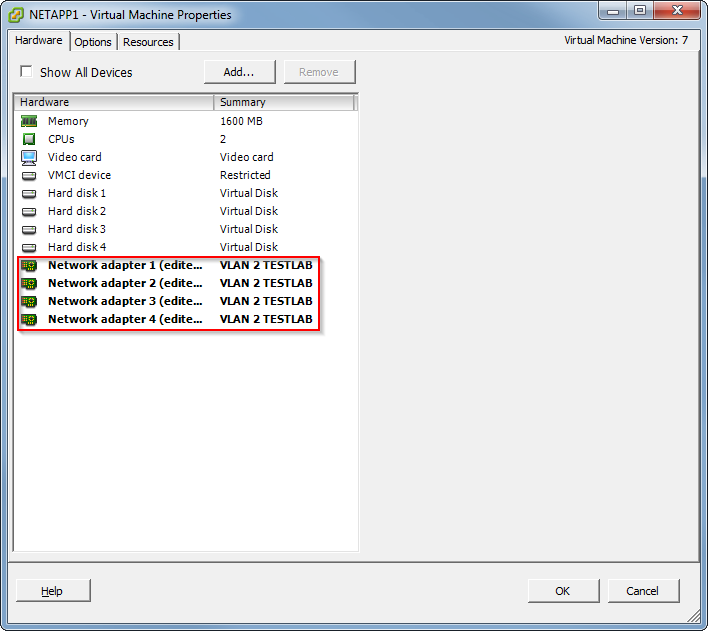
Patrick Terlisten/ vcloudnine.de/ Creative Commons CC0
Now we can power on the ONTAP 8 simulator. Let the ONTAP 8 simulator boot up until you have the chance to enter the boot menu with Ctrl+C. Choose menu item 4: Clean configuration and initialize all disks. This is necessary, because without this step, the simulator might hang and reboot repeatedly. This is clearly stated in the “Simulate ONTAP 8.2 Installation and Setup Guide”.
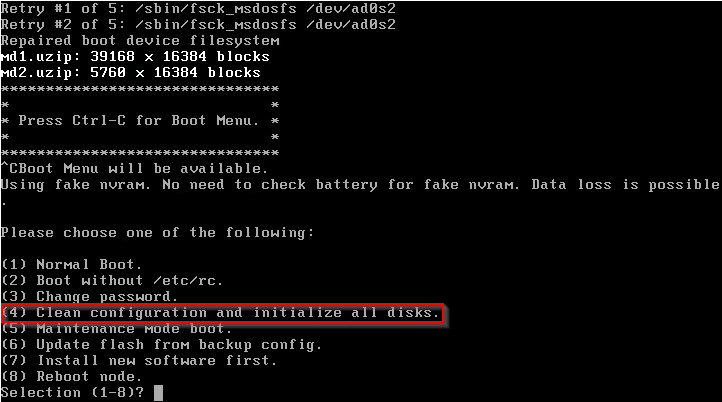
Patrick Terlisten/ vcloudnine.de/ Creative Commons CC0
You have to answer two questions with YES.
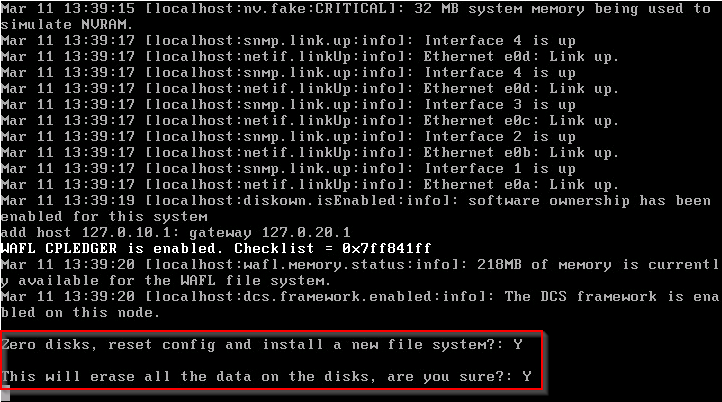
Patrick Terlisten/ vcloudnine.de/ Creative Commons CC0
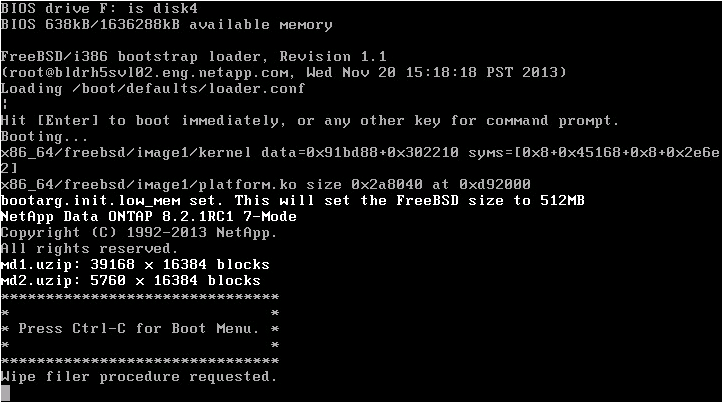
After this step the ONTAP 8 simulator will reboot and the wipe procedure begins.
Patrick Terlisten/ vcloudnine.de/ Creative Commons CC0
When the bootup is finished, the simulator welcomes you with a configure dialog.
Please enter the new hostname []: netapp1
Do you want to enable IPv6? [n]:
Do you want to configure interface groups? [n]:
Please enter the IP address for Network Interface e0a []: 192.168.20.35
Please enter the netmask for Network Interface e0a []: 255.255.255.224
Please enter media type for e0a {100tx-fd, tp-fd, 100tx, tp, auto (10/100/1000)} [auto]:
Please enter flow control for e0a {none, receive, send, full} [full]:
Do you want e0a to support jumbo frames? [n]:
Please enter the IP address for Network Interface e0b []:
Please enter the IP address for Network Interface e0c []:
Please enter the IP address for Network Interface e0d []:
Please enter the name or IP address of the IPv4 default gateway []: 192.168.20.62
        The administration host is given root access to the filer's
        /etc files for system administration.  To allow /etc root access
        to all NFS clients enter RETURN below.
Please enter the name or IP address of the administration host:
Please enter timezone [GMT]: Europe/Berlin
Where is the filer located? []: Leverkusen
Enter the root directory for HTTP files [/vol/vol0/home/http]:
Do you want to run DNS resolver? [n]:y
Please enter DNS domain name []: lab.local
You may enter up to 3 nameservers
Please enter the IP address for first nameserver []: 192.168.20.33
Do you want another nameserver? [n]:
Do you want to run NIS client? [n]:
Do you want to configure the Shelf Alternate Control Path Management interface for SAS shelves [n]: n
Setting the administrativ (root) password for netapp1 ...
New password:
Retype new password:
After this dialog, the ONTAP 8 simulator installation is nearly finished. Use a SSH client of you choise to access the simulator by using SSH. After you logged in as root via SSH, you have to install the necessary licenses. A list with license keys can be found on the ONTAP 8 simulator website. Please note that these license keys differ from the previous ONTAP 8 simulator keys! Please also note, that the keys are bound to the serial number of the ONTAP 8 simulator. So please don’t change the serial number! Simply copy ’n paste them to the SSH session. You can check the success of this operation with the “license show” command:
netapp1> license show
Serial Number: 4082367-72-5
Owner: netapp1
Package           Type    Description           Expiration
----------------- ------- --------------------- --------------------
NFS               license NFS License           -
CIFS              license CIFS License          -
iSCSI             license iSCSI License         -
FCP               license FCP License           -
SnapRestore       license SnapRestore License   -
SnapMirror        license SnapMirror License    -
FlexClone         license FlexClone License     -
SnapVault         license SnapVault License     -
SnapLock          license SnapLock Compliance License -
SnapManagerSuite  license SnapManagerSuite License -
SnapProtectApps   license SnapProtectApp License -
SnapLock_Enterprise license SnapLock Enterprise License -
Insight_Balance   license OnCommand Balance     -

 Congratulations! Your ONTAP 8 simulator is now ready to use.

netapp1> sysconfig
        NetApp Release 8.2.1RC1 7-Mode: Wed Nov 20 15:25:04 PST 2013
        System ID: 4082367725 (netapp1)
        System Serial Number: 4082367-72-5 (netapp1)
        System Storage Configuration: Multi-Path
        System ACP Connectivity: NA
        slot 0: System Board
                Model Name:         SIMBOX
                Processors:         2
                Memory Size:        1599 MB
                Memory Attributes:  None
        slot 0: 10/100/1000 Ethernet Controller V
                e0a MAC Address:    00:0c:29:9d:41:2c (auto-1000t-fd-up)
                e0b MAC Address:    00:0c:29:9d:41:36 (auto-1000t-fd-up)
                e0c MAC Address:    00:0c:29:9d:41:40 (auto-1000t-fd-up)
                e0d MAC Address:    00:0c:29:9d:41:4a (auto-1000t-fd-up)
A first step could be the configuration of CIFS. This is done using “cifs setup” command. I will highlight some features in subsequent articles.